HP Ink Cartridge ID Chip Swap Guide
🔔This is a user-submitted guide
What is presented here is not objective information about a company's relation to consumer rights and does not follow the Consumer Action Taskforce Wiki's usual content guidelines.
This is a guide intended to give you more rights over your purchase. Inclusion of guides such as this one is only permitted in certain circumstances described in the article types page.
This guide may be incomplete and the information in it may have not been validated or updated. For more information see the discussion around it.
- For official mission and guidelines, please see our Mission statement
If you believe this notice has been placed in error, please visit the #appeals channel on our Discord server: Join Here.
This article contains a guide on how to remove ID chips from OEM HP inkjet printer cartridges and install them on dimensionally identical cartridges of different model numbers, or third-party and refillable cartridges. The guides here do not cover all HP cartridge models, so if there's a working method for another family of cartridges, please add it here.
564, 902, 920, and 935 cartridges

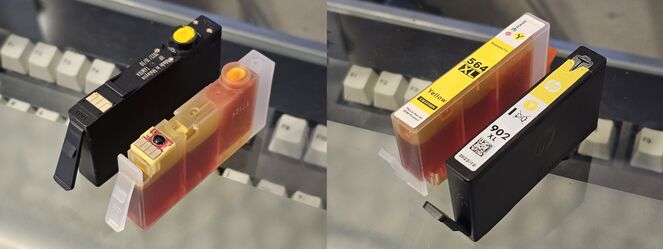
HP 564, 902, 920, 935 cartridges and their XL variants are all the exact same physical size, however they sport different ID chips that prevents them from being used outside a specific set of printers, despite being able to fit in an "incorrect" model.
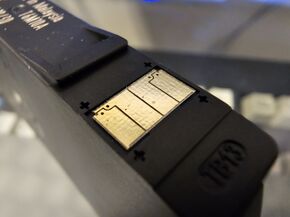
The chips used in the OEM cartridges are designed to break when pried up from the outside. Because of this, it is necessary to cut around the chip so it can be safely removed by gently bending away the underlying plastic, and not the chip itself.
Required Materials and Tools
In order to perform this hack, you need spent OEM or third-party compatible cartridges specific to your printer model. These can be sample cartridges, standard cartridges, XL cartridges, or any mix of the three - they just have to work in your printer and match the color of your replacements. If you do not have any on hand, you can generally buy empty cartridges off eBay.
As for tools, you're going to want a hobby knife (or anything with a small tip that can be used for gentle prying), a rotary tool with a cutting disc, and thin double sided tape (or some other weak temporary adhesive). Gloves and eye protection are strongly recommended.
In this example I am going to be using a yellow 902 XL cartridge as my donor and a yellow third party 564 XL cartridge as my recipient. Note how both cartridges are dimensionally identical, despite the difference in name.

TODO: Add images
Step 1
Flip your doner cartridge over and using the rotary tool, start cutting off the bottom section the cartridge around chip as shown. You may have some residual ink come out so I'd advise wearing gloves for this.
Step 2
Once you get the piece out, try to gently bend the plastic underneath the chip in order to separate it. If you can't bend it, use the rotary tool to whittle away a little more plastic under the chip before trying again.
If done properly, the plastic should bend away from the chip, allowing you enough room to free it from the adhesive using your hobby knife. If the chip still has the little black bead on it's underside intact, it was extracted successfully.
Step 3
Now to prepare the recipient cartridge. Depending on what you bought, it may or may not have a chip already pre-installed on it. My third-party 564 XL cartridge already has an incompatible chip on it, so I just pried it out with my hobby knife.
Step 4
Take a small amount of double sided tape (or your adhesive of choice) and stick the doner chip in the proper position on the recipient cartridge. Make sure it is oriented correctly, and not sticking out from the surface an unreasonable amount.
Step 5
Pop it into your printer and check the fit. If it seats fine and the printer properly recognizes the cartridge(s), go ahead and print a test page. If that works, you're done!
The modified cartridges will always show up as empty in the printer's ink level page, but they will still work. When you do run out of ink (and you didn't use refillable replacements), just pop the ID chip out of the cartridge and stick it on another one.
Now your printer is unshackled from HP's ink cartridge scam. Enjoy!
